Vodič za mjerenje kabela za audio u automobilu s tablicama
Vodič za promjer audio žica u automobilu s dijagramima
Kada nadograđujete svoj stereo sustav u automobilu, važno je nabaviti odgovarajuću veličinu žice, a iako postoji mnogo faktora u igri, ovaj vodič za promjer žice pružit će vam dovoljno znanja da shvatite koju veličinu odabrati.
Bilo da se radi o vašem pojačalu, subwooferu, zvučnicima ili drugim komponentama, nabavka odgovarajuće veličine žice ključna je za dobivanje najboljeg iz vaše nove opreme.
Pogriješiti ne samo da će utjecati na zvuk vaše glazbe, već može oštetiti vašu audio opremu, električne instalacije vašeg automobila, au najgorem slučaju čak biste mogli izazvati požar u vašem automobilu.
U ovom članku razmatramo glavne vrste audio ožičenja automobila i različite veličine žica koje su vam potrebne za svaku od njih. Za svako objašnjenje postoji tablica promjera žice, koja bi vam trebala dati dovoljno približnu ideju o promjeru koji vam je potreban.
Američki promjer žice (AWG)
Većina svijeta koristi američki mjerač žice (AWG), koji je američka standardna mjera za promjer električnih vodiča. Temelji se na broju matrica koje su izvorno bile potrebne za izvlačenje bakra na potrebnu veličinu. Dakle, što je niži broj, deblji je promjer žice.
AWG je prvi put predstavljen 1857. godine kao standard za zamjenu različitih mjera koje su koristili različiti proizvođači. Najveća veličina žice je 0000 AWG, dok je najmanja standardna veličina 40 AWG.
Ovo se koristi i za pune žice i za užetane žice, iako užetane bakrene žice mogu biti malo veće od čvrstih žica, iako su istog promjera. Unatoč tome, korištenje AWG vodiča za mjerenje žice dovest će vas do istog rezultata.
Mnogo se raspravlja o tome poboljšava li veći broj užeta vašu audio izvedbu, ali zapravo se ne radi o većem broju užeta žice, nego u dobivanju pravog promjera žice.
Provjerite jeste li ispravno osigurali žičane veze
Korištenje vodiča za promjer žice neophodno je za dobivanje prave veličine, ali sigurno spajanje žica također je kritično prilikom instaliranja bilo koje audio opreme jer će osigurati dobru, čvrstu vezu.
Loša veza može se brzo izgubiti, a ako se dogodi, može uzrokovati mnoge probleme vašem stereo sustavu i glavobolju koja vam nije potrebna.
Postoji mnogo različitih vrsta konektora, a neki su bolji za određene električne instalacije, ali koji god konektor upotrijebili, provjerite imate li čvrstu vezu.
Krimp konektori su dovoljno dobri. U osnovi, oni su električni konektor koji se koristi za završetak ili spajanje užetnih žica. Žica će ući u konektor i sve dok je stežete stezaljkama, imat ćete trajno, čvrsto držanje.
Lemljenje je također još jedan sjajan način za osiguranje vašeg električnog ožičenja. To je malo više posla, ali sve dok se radi kako treba, s ispravnom opremom za lemljenje, to je najsigurniji način povezivanja vaših žica i audio opreme.
Žice za lemljenje pružit će vam najbolju vezu, ali pazite da obavite posao kako treba. Ako to nikada prije niste radili, preporučio bih da nabavite neke crimp konektore, jer loše zalemljeni spojevi mogu dovesti do mnogih problema.
Nakon što spojite svoje žice, uvijek je dobra ideja spojeve omotati skupljajućim omotom. To će ih zaštititi od prašine i prljavštine i ojačati vašu vezu, osiguravajući da se vaše žice nikada neće odvojiti.
Dakle, sada imate sve informacije o AWG standardu i dobivanju najbolje veze za vaše električno ožičenje, vrijeme je da pogledate vodič za promjer žice za svaku instalaciju.
Veze za uzemljenje
Priključci za uzemljenje potrebni su za sve električne uređaje ugrađene u automobil. Uzemljenje je negativna električna veza koja napaja jedinicu, a uglavnom će biti spojena na šasiju automobila. Loše uzemljenje vjerojatno je najčešći uzrok problema sa zvukom u automobilu, pa provjerite jeste li to ispravno shvatili.
Žice za uzemljenje trebaju se sigurno pričvrstiti na čist, neobojen metal ili namjenske točke uzemljenja na kućištu. Odlično mjesto za spajanje uzemljenja je ispod vijka sigurnosnog pojasa, jer će vam to omogućiti sigurnu vezu sa šasijom.
Žice za uzemljenje trebale bi biti odgovarajuće veličine žice potrebne za aplikaciju. Dakle, ako instalirate pojačalo od 600 W, vaš promjer žice za uzemljenje mora to moći napajati.
Općenito, vaša žica za uzemljenje bit će iste veličine kao i kabel za napajanje o kojem govorim ispod, tako da za pravi vodič za promjer žice za vaše uzemljenje slijedite veličinu kabela za napajanje.
Spajanje pojačala u vašem automobilu
Vaše je pojačalo jedan od, ako ne i onih koji najviše troše energiju, a što veći RMS vaše pojačalo može postići, to će vam trebati veći kabel za napajanje.
Ako provedete premalu strujnu žicu, vaše bi se pojačalo moglo brzo oštetiti, pa provjerite jeste li ovo ispravno odradili.
To work out the wire gauge needed for your power cable you need an idea of how much current your amp will try to consume, and on how long the wiring run from battery to amplifier will be.
To work out the approximate amperes of your amplifier, you need to multiply the number of channels by the RMS per channel. If you have more than one amp, you need to add them all together, and divide that by the efficiency and then the voltage.
There are two common types of amplifiers:D Class and A/B Class. You never get 100% efficiency out your amp, so it throws another spanner in the works. Generally, Class D amps are more efficient and you should get around 75% efficiency, whereas with an A/B amp you will get around 50% efficiency.
So, to work it out:If you have a Class D amplifier, you need the total RMS divided by 0.75 Amp Efficiency divided by 13.8 Volts to get your Current Draw in Amperes.
So, if you have a 600W RMS Class D amp, your math will be 600/0.75/13.8 =57.9710145, which rounded up is 58 amperes.
As you can see in the wire gauge chart below, the gauge needed for an 8 foot power cable would be 8 gauge.
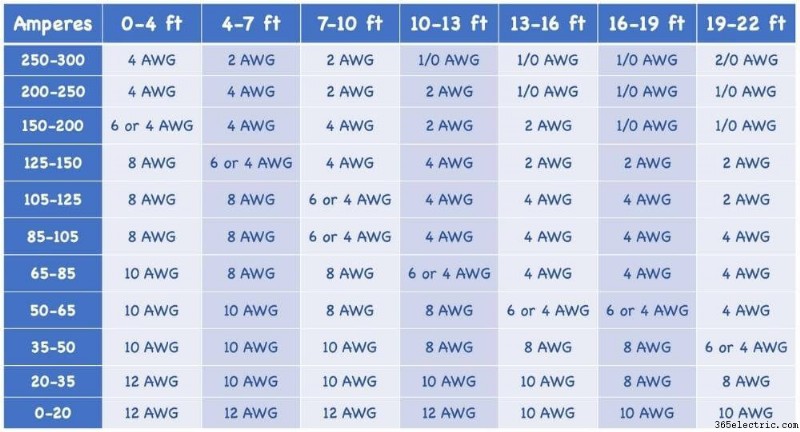
If you have an A/B Class, you need the total RMS divided by 0.50 Amp Efficiency divided by 13.8 Volts to get your Current Draw in Amperes.
So, if you have a 600W amp, your math will be:600/0.5/13.8 =86.956521, which I’d round up to 87 amperes.
As you can see in the wire gauge guide above, the AWG I’d need for a power cable of the same length would be either 6- or 4 gauge wire. I would always round down and go for the bigger wire so I’d get a 4 gauge power cable. Quite a difference from the D Class amp above!
Other Wires Running From Amplifier to Receiver
You can get amp wiring kits with all the wires and connectors in, which are a good idea as you can keep hold of them in case you need to replace any wires further down the line.
All amplifiers will come with a Remote Turn-on Wire, but if you have to replace it, you should get an 18 AWG blue wire.
For the RCA Jacks, you will just need to replace them with some standard RCA male-to-male jacks. These usually come between 22 gauge to 18 gauge, and the more powerful your amplifier is, the better it is to go with the bigger 18 gauge
Speaker Wires
Running speaker wires, whether it’s directly from your head unit or from your amplifier, allows your speakers to receive the audio signal, so they can reproduce those amazing sounds we all love to drive along to.
Speaker wires are typically 2 separate stranded wires molded together, with one strand being the positive + and the other strand being the negative – strand.
There are many different qualities of speaker wire, so it’s a necessity that you get the best you can afford, because cheaping out on speaker wires, will cause you problems and you won’t get the best out of your audio equipment.
Some cheaper wires that claim to be a certain gauge might not be, and instead you’ll be buying more plastic sleeve than wire.
Depending on the speakers you have will determine the wire gauge you need, and below in the wire gauge chart you can work out what is best for you.
Factory speakers will run on pretty much any size wire, as the power demands are minimal. But of course, most people into audio upgrade their car speakers, so getting the right size wire is necessary for you speakers and subwoofers.
Aftermarket speakers need more power, so the electrical wiring that drives the signal to them needs to be bigger than factory speakers.
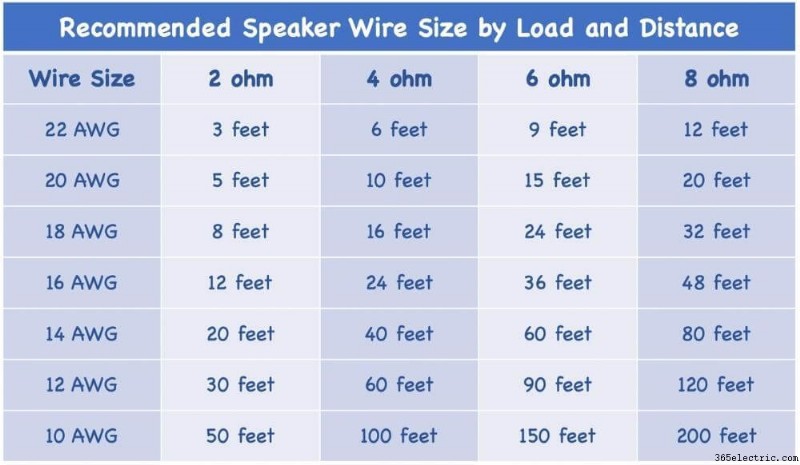
Speaker wires are usually between 18-14 gauge, but to work out the size for yours, you should know the Impedance and distance.
Looking at the chart above:If you are running speakers at 4 ohms and the distance needed is 20 feet, then you are between 18 and 16 AWG. In this case I would always go for the bigger wire, so go for 16 gauge.
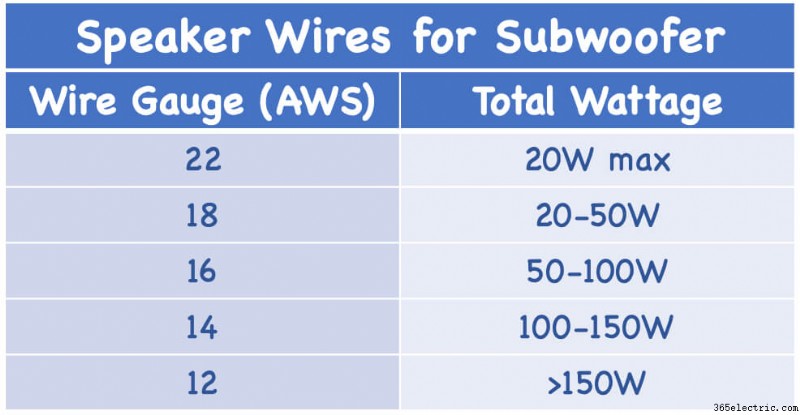
For subwoofers the speaker wire will tend to be a bit bigger. Usually you will need as big as 14-12 AWG, but the calculations are the same as the speaker wires on the wire gauge chart above.
Although another general rule of thumb is to work out its total wattage, and looking at the wire gauge chart here with RMS wattage, you can just go for that size wire.
You can use both wire gauge guides to come up with the wire size you need, but generally speaking you should need something between 16- and 12 gauge speaker wire for your subwoofer. And always go for the bigger wire if you’re getting mixed results.
Crossover Wiring
Using a crossover gives you more control over your sound system, but many people get confused with the electrical wiring.
Crossovers need 12v of power, which many people think it needs a thicker gauge wire, but because crossover demands less current, as a general guide 18 gauge wire is usually fine.
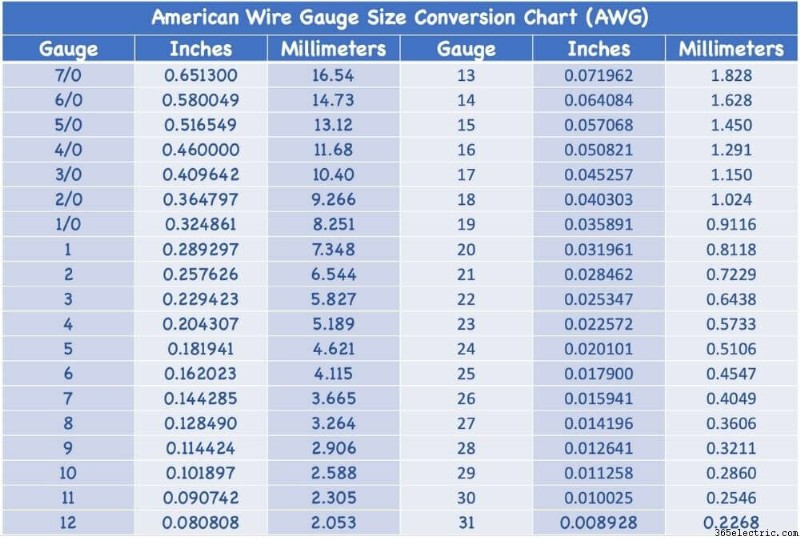
Wire Conversion Chart
All measurements in the wire gauge charts above are imperial, but for anyone who works in metric (most of the world), please find the wire gauge chart below for converting inches to millimeters useful.
Other FAQs About Electrical Wiring Gauge
Why do you need different gauge for different wire lengths?
Basically, resistance increases the longer electrical current has to travel. This is because as it’s travelling the electrical resistance builds up, so the longer it is, the more resistance. And the electrical current can only travel so far before there’s a voltage drop, which is why you need a bigger power cable.
What happens if I go too small?
If you get too small a size wire, it depends, but it’s not good. You might be lucky and just temporarily lessen the quality of of your soundstage, or you could damage your equipment and even set your car on fire.
The problem is determined by the wrong wires you install. That’s why it’s always necessary to know the correct size you need by looking at wire gauge guides.
What happens if If I go too big?
If you go too big, don’t worry too much as it won’t damage anything. But of course if you go too big it will cost you unnecessary outlay as the bigger wires are more expensive.
Also, the bigger the wire, the more room it will take up and the harder it is to bend. So, try and get it right, but too big is definitely better than too small.
What happens if my wires are too long?
When you buy the wires, it’s always a good idea to buy more than enough. However, when you install your audio equipment, don’t leave too much wire hanging out or even rolled behind something, even if it’s hidden.
Cut the wire at the appropriate length, because longer wires add unnecessary resistance and can create impedance. It also leaves your car looking messy.
Choosing The Right Size Wire for The Right Audio Equipment
So there you have it, a wire gauge guide for all the important electrical wiring in your car stereo system.
All the different wire sizes can be confusing, but looking at the charts or even a wire gauge calculator will give you a better understanding of which size to get.
All wiring is important, but pay particular attention to your power leads and do the math correctly for the total amperage and distance, because this is where you could get most problems.
Always ensure you buy good quality wiring, because you don’t want more sleeve than wire. There are some great amp wiring kits out there with all wires needed, so if you need the full bundle one of these is a good way to go.
Last but not least, always make sure you connect all wires with a good solid connection. Whether it’s crimp connectors or soldered connections, it’s up to you, but whichever way, make sure you test the connection with a few good tugs as you wire everything up.
If you have any questions and need more wire gauge guidance, leave a message in the chatbox below and we will get back to you.