Kako spojiti EQ i skretnicu za audio u automobilu + dijagrami i više!
Dobar zvuk u audiosustavu vašeg automobila uvelike ovisi o opremi koju koristite - i kako koristite ga. Ekvilajzeri i skretnice neka su od najkorisnijih ulaganja koja možete napraviti za svoj sustav.
U ovom ću članku objasniti kako spojiti EQ i skretnicu za audiosustav automobila. Unutra ćete pronaći korisne dijagrame, osnove koje trebate znati i neke druge stvarno korisne informacije!
Što ide prvi EQ ili crossover? Equalizer vs crossover razlike
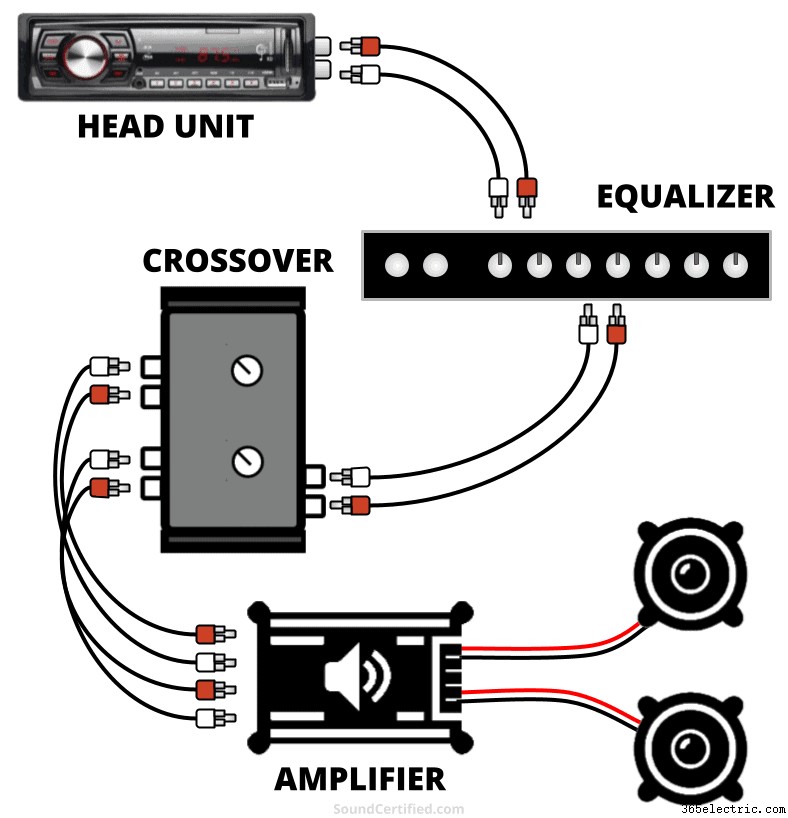
Kada koristite i ekvilizator i skretnicu, ekvilizator je spojen prije skretnice. Postoji nekoliko razloga za to – jedan od njih je uloga ekvilizatora u odnosu na ono što radi crossover.
Ekvilajzeri (čak i oni koji mogu uključivati dodatne značajke skretnice) prilagođavaju sadržaj audio signala, dok se skretnice koriste za odvajanje dijelova audio signala usmjerenih na jedno ili više pojačala.
- Koristimo ekvilizatore kako bismo poboljšali zvučne frekvencije u glazbi i prilagodili sam audio signal.
- Skretnice se koriste za kontrolu zvuka koji se šalje jednom ili više pojačala na temelju zvučnika koje ćemo koristiti i za postavljanje instalacija poput 2-staznih ili 3-staznih komponentnih sustava zvučnika.
Što ekvilizator radi za zvuk automobila?
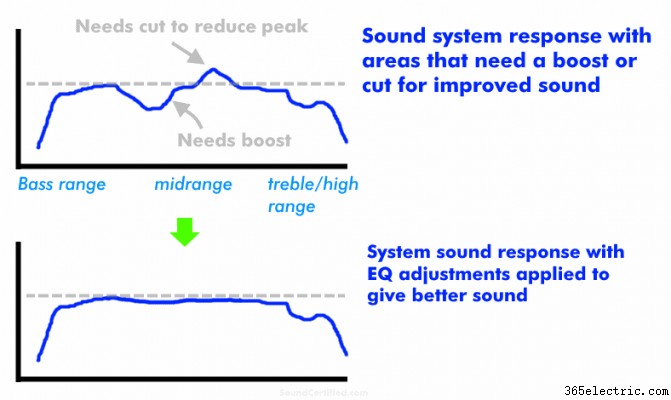
Dijagram koji prikazuje osnovnu ideju ekvilajzera. Ekvilajzer je koristan za povećanje ili smanjenje malih raspona zvuka u vašem audiosustavu radi poboljšanja zvuka. Na primjer, "vrh" (područje veće glasnoće) u nekim frekvencijama može se smanjiti, dok se druge mogu pojačati.
Ekvilajzeri nisu samo otmjeni naziv za nešto cool za igru - iako definitivno nisu svi stvoreni jednaki kako se kaže. Ekvilajzeri su elektronički uređaj koji vam omogućuje da poboljšate kvalitetu zvuka ugađanjem "pojasa" ili raspona zvučnih frekvencija u vašoj glazbi.
To čine pružanjem kontrola za povećanje ili smanjenje ("pojačavanje" ili "sjecanje") frekvencija zvuka kako bi se poboljšao frekvencijski odziv koji proizvode vaš sustav i zvučnici.
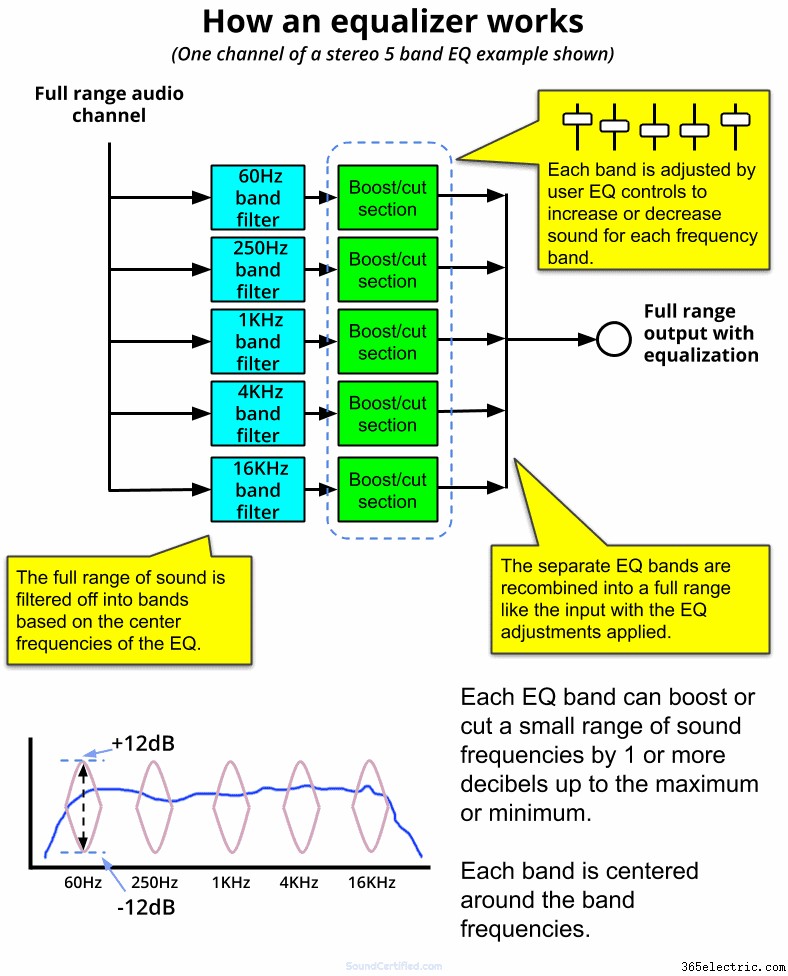
Ekvilajzeri pružaju brojne kontrole (obično klizne kontrole ili okretne gumbe) koje vam omogućuju podešavanje zvuka prema vašim željama. Na primjer:nema dovoljno basa? Možete pojačati jednu ili više tipki u nižim frekvencijskim područjima (bas). Je li glazba preoštra u nekim područjima poput srednjeg tona? Možete smanjiti (smanjiti) raspon audio frekvencija koje vaši zvučnici proizvode previše.
Koja je svrha crossovera?
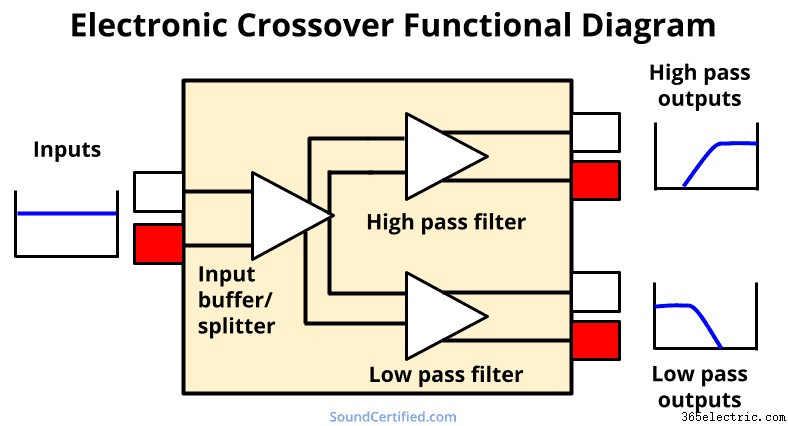
Skretnice su elektronički uređaji koji razdvajaju dolazni glazbeni signal punog raspona u jedan ili više visoko- ili niskopropusnih signala. Omogućuju blokiranje neželjenih zvučnih frekvencija koje idu do određenih zvučnika kako biste dobili najbolji zvuk, spriječili izobličenje i dobili bolji zvuk.
Na primjer:
- Tweeters bi trebali biti zaštićeni od basa koji biste poslali na veće zvučnike. Stoga koristimo visokopropusne skretnice s visokotoncima i drugim malim zvučnicima.
- Vuferi zvuče loše kada reprodukuju široki ili srednji raspon zvuka. Možemo postići vrlo čist zvuk i "čisti" bas koristeći niskopropusnu skretnicu za njih.
Elektroničke skretnice su danas ugrađene u mnoga pojačala za automobile. Međutim, možda koristite jedno ili više pojačala koja ih ne nude ili imaju ograničenu količinu kontrole. Zasebna elektronička skretnica omogućuje vam veću kontrolu i prilagodbu nego inače.
Možete ih koristiti i za modernije prilagođene audio sustave automobila.
Poboljšava li skretnica kvalitetu zvuka?
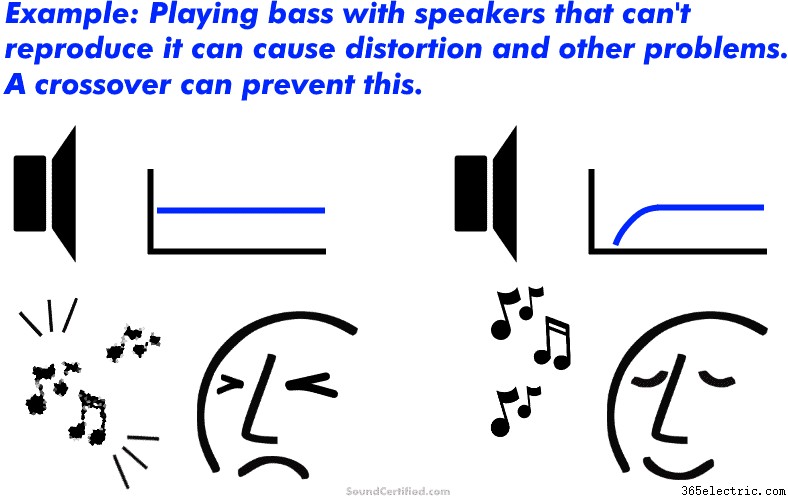
Skretnice mogu pomoći u kvaliteti zvuka, ali ne na isti način kao ekvilizator. Na primjer, možemo upotrijebiti visokopropusnu skretnicu s manjim zvučnicima kao što su 6,5 inčni zvučnici punog raspona za blokiranje vrlo niskih basova koji uzrokuju izobličenje i koje zvučnici ne mogu podnijeti. Rezultat je bolji zvuk bez užasnog zvuka koji zvučnici imaju kada ih više ne mogu podnijeti.
Isto tako, blokiranjem neželjenih zvukova srednjim bas zvučnicima ili subwooferu rezultat je "čist" raspon zvuka izvrsnog zvuka bez grubosti ili izobličenja zvukova za koje oni nisu dizajnirani.
Pravilno postavljen sustav zvučnika koji koristi skretnice imat će mnogo bolji zvuk nego bez njega. Također možete pokrenuti zvučnike s više snage i glasnoće nego što biste inače mogli. Rezultat je vrlo lijepa jasnoća zvuka i ugodna glazba čak i na višim razinama snage.
Kako spojiti ekvilajzer na stereo uređaj u automobilu? (DIJAGRAM)
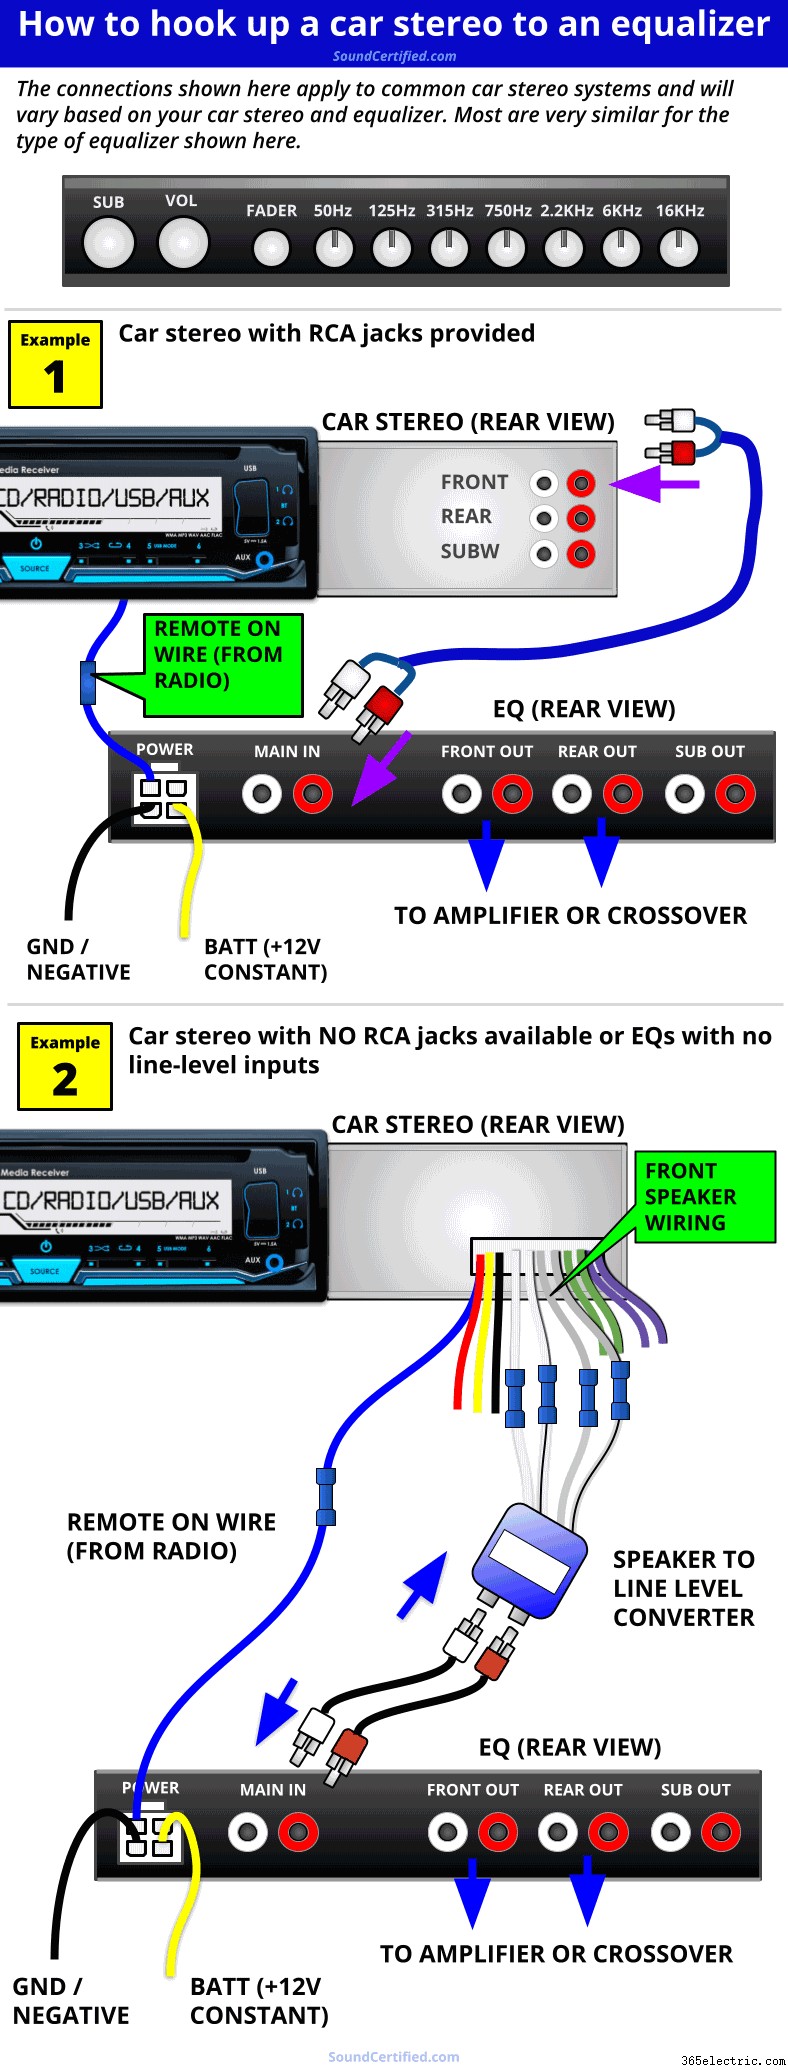
Povezivanje stereo uređaja u automobilu s ekvilizatorom općenito je prilično jednostavno. Većina je više-manje ista, ali naravno mogu malo varirati od modela do modela. Ovdje ću pokriti osnove, a zatim raspraviti o crossoverima u sljedećem zasebnom odjeljku.
1. Spojite ožičenje za napajanje i daljinsko uključivanje
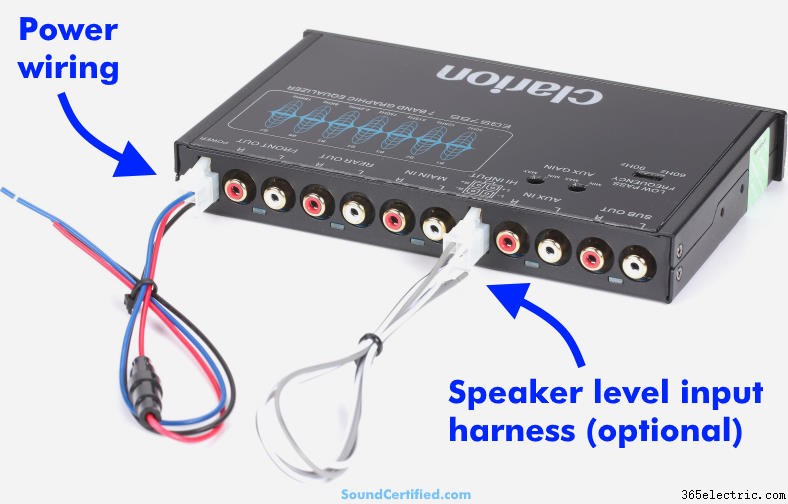
Primjer tipičnog ekvilizatora sa svojim kabelskim snopom za napajanje i dodatnim snopom ulaza za razinu zvučnika. Većina EQ-a koristi tri priključka za napajanje:+12 V konstantno (napajanje iz baterije), kabel za daljinsko uključivanje i uzemljenje.
Ekvilajzeri obično imaju prilično jednostavno ožičenje koje ćete morati spojiti za napajanje i kontrolu uključivanja:
- Žica za uzemljenje (negativna) – spojite na uzemljenje vozila (šasije) ili također na uzemljenje radija.
- Napajanje baterije – spojite na memorijsku vezu radija (+12V BATT) ili na neki drugi stalno uključen izvor +12V.
- Daljinski na žici – ovo automatski uključuje ili isključuje EQ s radiom. Spojite ovo na žicu za daljinsko uključivanje radija za najbolje rezultate (također je lakše nego koristiti drugu žicu u mnogim slučajevima).
- *Osvjetljenje/prigušivač [ako postoji] – Ovo nije tako uobičajeno, ali neki EQ-i imaju kontrolu prigušivanja. Obavezno provjerite korisnički priručnik jer neki prigušuju EQ zaslon ili osvjetljenje kada je spojen pozitivni svjetlosni signal. Drugi aktiviraju dimmer s negativnim (ili uzemljenjem) priključkom. Možete zanemariti ovu žicu ako želite – žice za prigušivanje/kontrolu osvjetljenja nisu potrebne.
Ekvilajzeri općenito koriste samo nekoliko pojačala, tako da u većini slučajeva nećete morati brinuti o njihovom spajanju s zasebnim priključkom za napajanje kao što je primjerice pojačalo za automobil. Osim toga, također je često dobra ideja koristiti isti priključak za uzemljenje kao radio jer cviljenje alternatora (šum petlje uzemljenja) može biti problem za neke instalacije.
Nakon što ste spojili ožičenje za napajanje, vrijeme je da uspostavite vezu audio signala.
2. Spojite RCA ulaz signala ekvilizatora
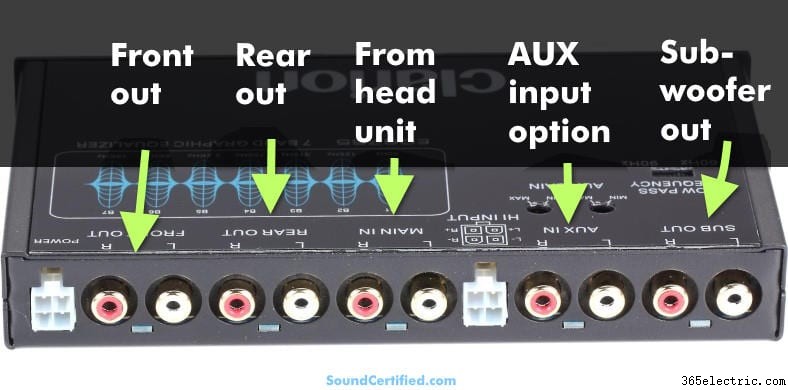
Većina EQ-a koristi jedan par RCA ulaza koji se spajaju na RCA izlazne priključke vaše glavne jedinice. To je zato što standardni EQ koriste jedan skup EQ kontrola koje rade na lijevom i desnom kanalu u isto vrijeme. Mnogi također uključuju kontrolu fadera sprijeda na stražnju stranu, tako da vam često neće trebati stražnja RCA veza stereo uređaja u automobilu.
Spajanje RCA priključaka na automobilskom ekvilizatoru:
- Glavni RCA ulazi: Spojite ih na (prednje) RCA priključke glavne jedinice, ako su dostupni. (Ako vaša glavna jedinica nema RCA, ne brinite – o tome ću govoriti sljedeće)
- Prednji RCA izlazi: Spojite se na glavne RCA ulaze skretnice ako je model samo sa stereo (2 ulazna priključka). Ako ne koristite skretnicu, povežite je s prednjim RCA ulazima vašeg pojačala.
- Stražnji RCA izlazi: Spojite se na stražnje RCA ulaze skretnice ako su dostupni i ako vam je ovo potrebno. U suprotnom, možete ih zanemariti i zanemariti kontrolu prigušivanja na EQ-u. Ako ne koristite skretnicu, spojite ovo na stražnje RCA ulaze vašeg pojačala.
- RCA izlazi za subwoofer (opcionalno): Oni su izborni i obično imaju niskopropusnu skretnicu ugrađenu u izlazni dizajn. Ako ne koristite skretnicu između pojačala.
- AUX ulazni RCA priključci (opcionalno): Neki ekvilajzeri nude značajku AUX ulaza koja vam omogućuje izravno spajanje utičnice za slušalice na telefonu, MP3 player i tako dalje. Connect this to a 3.5mm stereo headphone to RCA cable as needed and use the AUX input switch when listening to other sound sources.
Once you’re connected to the car stereo and the crossover you’re ready to install the crossover too.
Connecting a car stereo with no RCA jacks to an EQ
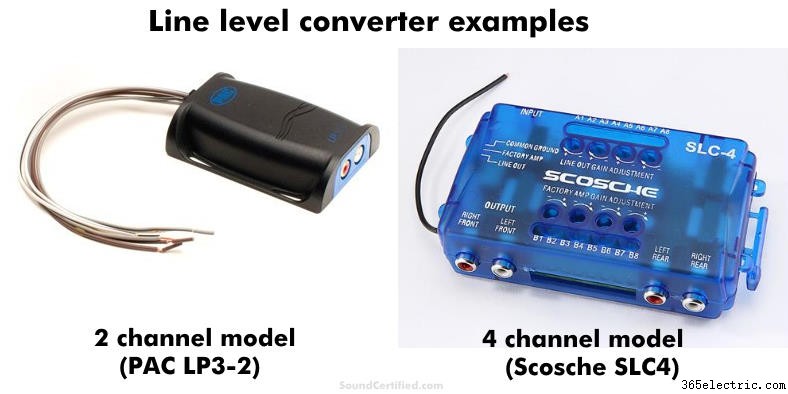
Examples of two good speaker wire line level converters (one for a pair of speaker outputs, one for 4 speaker channels &4 RCA outputs). Line level converters scale down the higher voltage signal from a car stereo to a lower voltage (“line level”) that an EQ, crossover, or amplifier can use without distortion or damage.
The great news is that you can still use an EQ and crossover with a factory or aftermarket car stereo with no RCA jacks. You’ll need a good quality speaker output to line level converter to do this.
Line level converters are designed to allow connecting to an amplifier’s RCA inputs by converting speaker outputs from a stereo (a higher voltage required to drive speakers) to a low-level signal that an EQ, crossover, or car amplifier can use.
It’s very important to buy a quality, well-designed line-level adapter to avoid noise, poor sound quality, and other problems. Don’t get the cheapest – instead, get a name-brand model you can rely on (like the examples you see above). You can get a nice one like these for around $15-$20 or less these days.
How to wire an EQ and crossover for car audio (DIAGRAM)
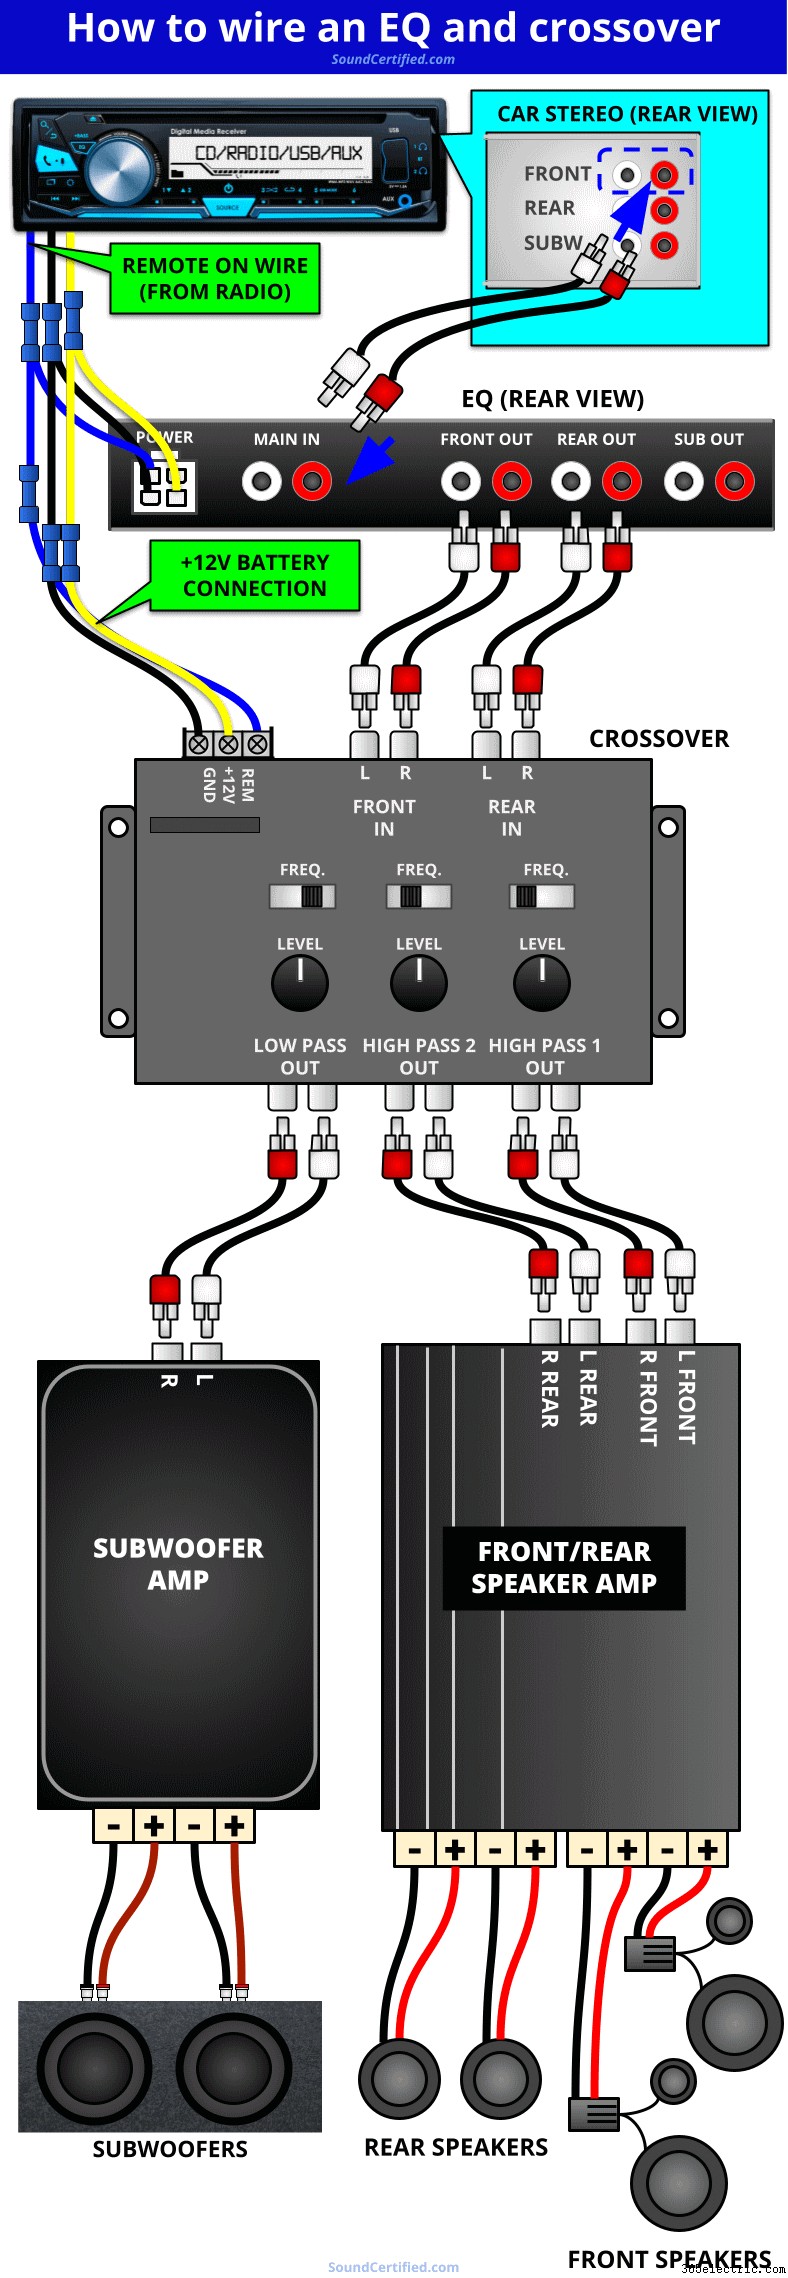
This diagram shows the basic connections for an equalizer and crossover. While the particular equalizer or crossover you have may be slightly different, most have very similar connections.
The diagram above is a guide for how to make the right connections for your equalizer and your crossover. You can expect some slight differences depending on the model you have and the system you’re wanting to install but most should be very similar.
How do you connect a crossover to an equalizer?
To connect a crossover to an equalizer you’ll want to use the front or main RCA outputs of the equalizer for the inputs to the front channels or main inputs on your crossover.
- Full range input(s): the crossover’s main signal input from your car stereo or in this case the equalizer. The equalizer will send a full-range signal which you can then divide as needed for your system using the provided outputs. Some crossovers only have a single pair of inputs while others have front, rear, and sometimes even subwoofer inputs. These additional inputs are usually optional.
- High-pass outputs: these are the high pass (bass blocked) audio outputs for your main amplifier channels such as front or rear speakers. Using the selectable crossover frequency you can block bass and instead send it to subwoofers for better sound &power handling.
- Low-pass outputs: these are for sending only bass to your amplifier used for midbass speakers or subwoofers. Low pass outputs on a crossover usually have a selectable crossover frequency similar to the high-pass outputs, but usually limited to 250Hz or below.
Connecting power to a crossover
Crossovers normally have wiring similar to an equalizer:a ground wire (negative), +12V battery wire, and a remote-on wire. If it’s convenient you can connect the crossover and equalizer wiring to the connections at the radio:
- +12V battery connection:connect to the radio’s memory wire or another power source that has +12V all the time (does not change with the ignition switch).
- Ground wire:connect to the vehicle’s chassis via bare metal or the same ground wire as the car stereo.
- Remote wire connection:connect to the car stereo’s remote wire or alternatively a +12V accessory wire that turns on &off with the ignition.
Can I use a separate crossover and my amp’s crossover?
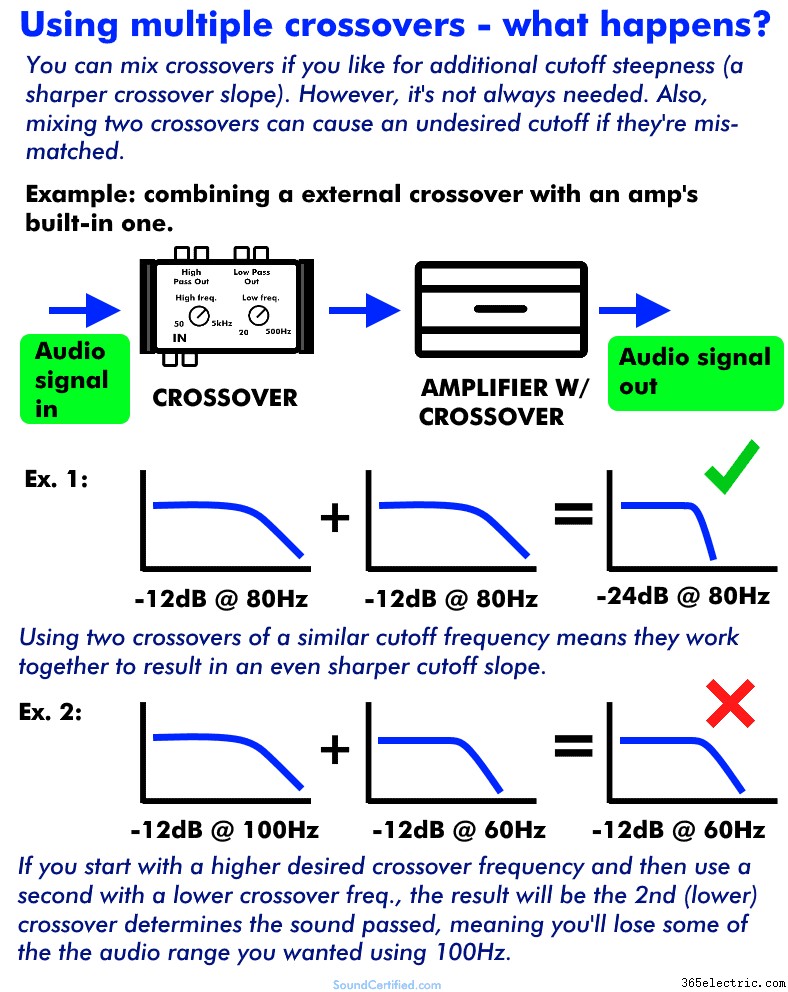
Yes, in many cases you can use an external crossover and the one built into your amplifier or head unit. However, it’s generally not needed in most cases.
These days it’s pretty standard to find -12dB per octave crossovers (also called “2nd order”) in electronic crossovers and amplifiers too. That’s normally a pretty good cutoff steepness for all sorts of speakers including main speakers, tweeters, and subwoofers.
However, if you need an even steeper crossover frequency (say -18dB or -24dB per octave) you can use more than one. There are some things you’ll need to know first:
- You can combine the crossovers for similar cutoff frequencies. The steepness will combine, meaning you’ll get even better filtering of unwanted sound frequencies.
- Mismatched crossovers can mean you’ll have undesirable sound. For example, let’s say you’ve set your crossover to 70Hz and you’re also using an amp’s crossover set at about 50Hz. The end result is the lower cutoff frequency from the amp would block portions of sound you wanted.
When in doubt, always use a 2nd crossover that’s of the same or higher cutoff frequency and you should be ok. As some of today’s car stereos include high or low-pass crossovers, those can be used as well (or instead of the ones built into your amp). They’re also more convenient to change too since they’re right there in the dash.
Koje su dobre frekvencije skretnice za zvuk automobila?
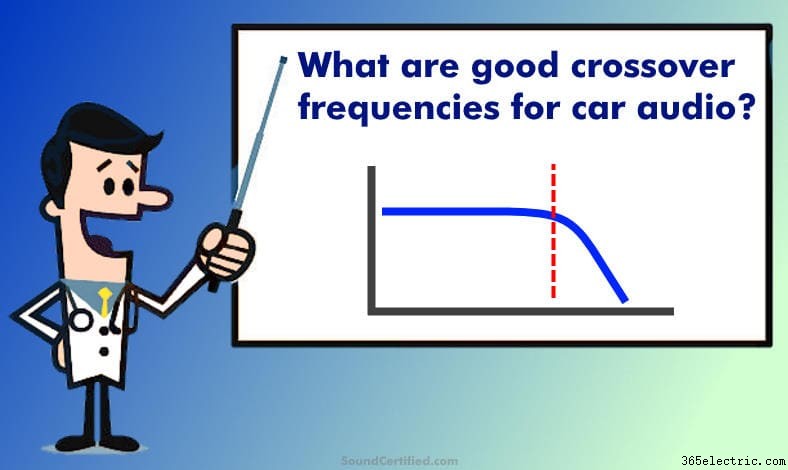
Car speakers are somewhat different from home audio in that they often suffer from terrible kućišta što pogoršava probleme koje imaju pri proizvodnji određenih zvukova. I’ve put together some crossover frequencies below as general guidelines that work well in most cases. You may need to tweak them a bit for your particular system.
For example, small speakers with no real enclosure may have horribly “thin” sound – in that case, you may need to raise the high-pass filter (HPF) frequency even higher to minimize sound problems. Koristite ih kao početnu točku, pogledajte što dobivate i krenite dalje.
As a side note, be aware that a crossover can’t compensate for a subwoofer that’s poorly matched to a speaker box. It’s very important for good bass sound to have subwoofers in an enclosure of the right size and type.
Tablica učestalosti skretnice audio zvučnika automobila i pojačala
| Speaker/System Type | Frekvencija skretnice &Tip | Napomene |
|---|---|---|
| Subwoofers | 70-80 Hz (low pass) | Good low-pass frequency range for subwoofer bass &blocking midrange sounds. Najbolje za čisti, jasni bas zvuk koji "pogađa". |
| Car main (full range) speakers | 56-60Hz (high pass) | Blocks low-end bass that causes distortion or speakers to "bottom out." Izvrstan kompromis između zvuka punog raspona i sposobnosti srednjeg basa. |
| Tweeters or 2-way speakers | 3-3.5KHz (high pass, or high/low-pass) | Most 2-way or 1-way (tweeter) crossovers use a frequency near this as most tweeters can't handle sounds below this range. Isto za niskotonce iznad ovog raspona. |
| Midrange/woofer | 1K-3.5KHz (low pass) | Woofers and many midrange speakers do not perform well above this general range. Slabi su za visoke tonove i treba dodati visokotonac. |
| 3-way system | 500Hz &3.5KHz (Woofer/tweeter crossover points) | Similar to 2-way systems the upper freq. bilo bi isto. Srednjetonski pogonski programi u 3-staznom sustavu često ne rade dobro ispod 500 Hz ili 250 Hz u mnogim slučajevima. |
What are some good EQ settings for the best sound?
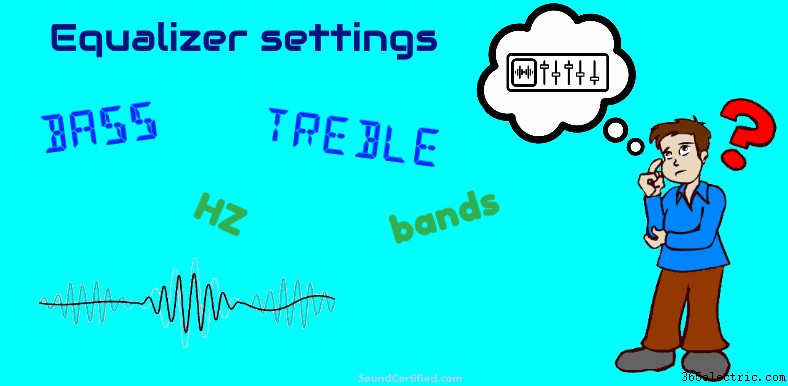
The simple truth is that there’s not a true “best” equalizer or audio system setting. It depends on your goals, but ultimately, the best settings are those that let you tailor the sound in a way that pleases your ears the most.
Regardless, I do have some general equalizer guidelines that can help you. I’ll make sure to cover those in a separate section below after explaining why an equalizer (EQ) is so helpful and the problems with speaker sound.
To keep things organized I’ll break this down into two approaches:
- Setting your EQ by ear
- Using a real-time analyzer (RTA) and microphone
1. Setting your EQ by ear
Here I’ll share with you some basic steps and EQ settings when doing it by ear. In the section after this, I’ll go into the best way to do so:by tuning your system using the right tools.
Note that tuning audio for car systems by ear is more for correcting the most obvious problems you can hear easily. To really know what’s going on with your system, you’ll need the right tools and approach I’ll share in the sound system car tuning guide below.Getting started
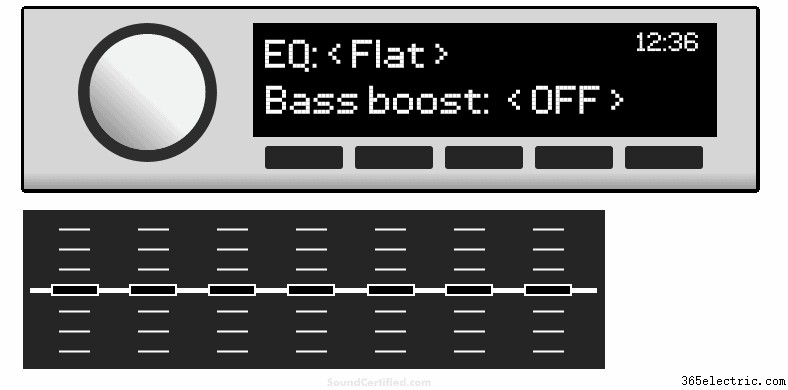
My advice is to do the following before adjusting an EQ:
- Disable any special audio modes like bass boost or “music enhancement.” Turn the bass boost, if present, to “flat” or off.
- Set the equalizer band adjustments all to flat. That is, to 0dB level, in the middle of the equalizer display (or to 0dB if it uses a number style control).
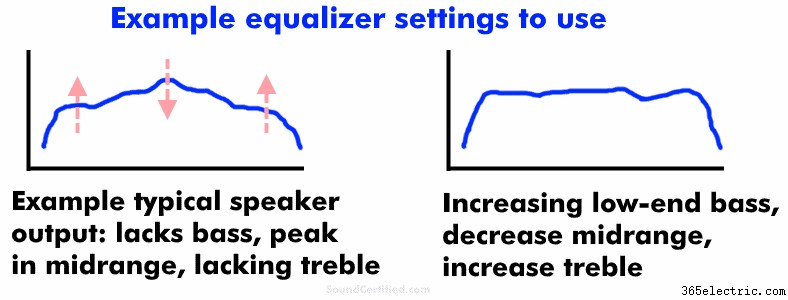
For many speaker systems (for example factory speakers with a factory-installed head unit), typically the sound is lacking in 2 or more areas:
- Not enough bass
- Too much midrange
- Not enough treble (high frequency sounds like cymbals and string instruments)
- Music has poor detail and doesn’t sound like the recording should
I recommend doing the following, being sure to use small adjustments with the equalizer and make changes slowly while listening carefully.
- Increase the bass a bit in the low-end range. This will be a band with a frequency of 60Hz or close to it – this depends on your particular EQ. You can then increase it a bit in the band above it and hear the results (ex.:120Hz band, which is still bass but on the lower end of midrange sound &vocals).
- Increase the treble 6dB or so around the highest band on the upper end of the EQ, then continue increasing by 3dB if you hear an improvement. Continue until it sounds unpleasant to you, then decrease back until it’s better. This is usually a band with 16KHz or similar (some only go to 12KHz, which isn’t good, sadly). Treble can be a problem because speaker placement is less than ideal in vehicles along with poor quality factory-installed speakers, too.
- If you hear “harshness” and the vocals and instruments in music sound like they’re grating on your nerves, you probably need to decrease midrange sound. Start with a band around 1KHz and decrease by about 3dB and listen for improvement. If there isn’t any, set it back to 0, then move up to 2KHz, 4KHz, and so on as needed.
Visualizing adjusting an EQ for the most basic ranges of sound
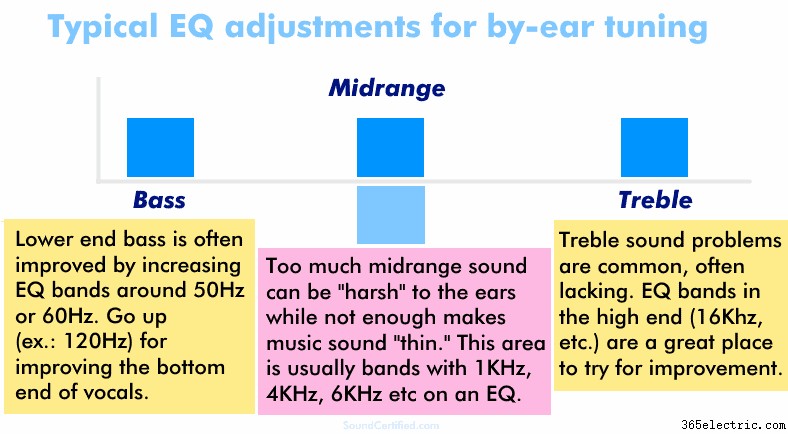
The idea is to know how the music should sound with everything set up properly and judge your EQ settings by ear using test music.
Our ears are most sensitive in the midrange span of sounds so that’s often one of the biggest problem areas of speakers that need attention. Tweeters very often need some increase at the high end, too. It’s a huge problem with factory-installed tweeters that have a poor response (sound output) at the highest end of the sound range.
2. Using a real-time analyzer (RTA) to tune your EQ
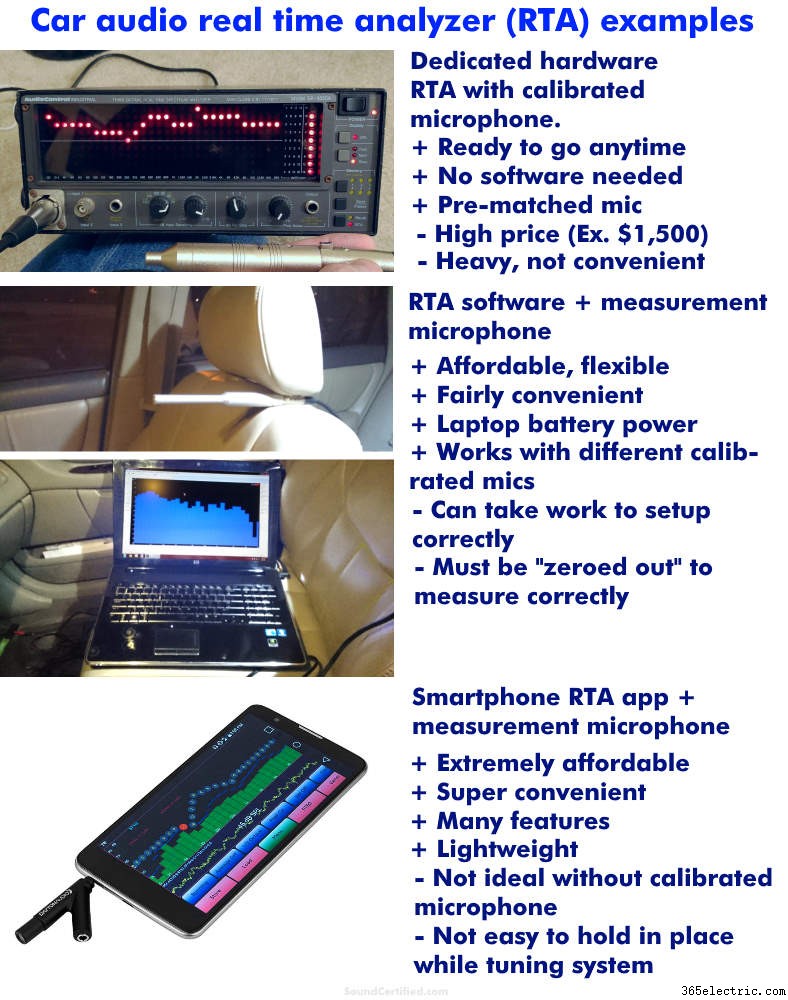
Some examples of your options for measuring and tuning your car audio speaker system. Of the 3, using a laptop and RTA software or smartphone app are the best values for the dollar. Today’s smartphone apps like AudioTool offer many of the same features as much more expensive options.
The best way to tune your system (find the optimal equalizer settings) is to use a measurement tool and find the areas that needed adjusting. To do so, you’ll need a real-time analyzer (RTA) and microphone. There’s simply NO WAY to get the best sound using only some music and adjusting it by ear.
This used to be way too expensive in the past. However, these days you can find get good results using your laptop and RTA software (such as TrueRTA, for example) or use an inexpensive RTA app with your Apple or Android smartphone.
For the sake of keeping things simple, I’ll cover using a smartphone and an RTA app. I recommend AudioTool for Android as it’s very good and while it’s not free, it’s cheap! ($7.99 at this time). Using an app isn’t as accurate as a more expensive setup but it’s enough in most cases to get the job done pretty well.
Using an RTA app and microphone for tuning sound
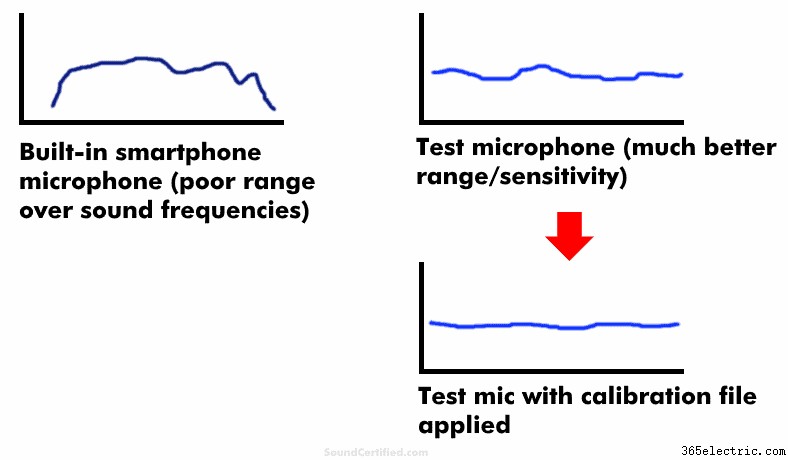
I don’t recommend using a smartphone’s built-in mic for tuning your equalizer settings. Built-in mics have poor frequency measurement performance compared to a real test microphone. Calibrated microphones also include a file to allow them to give a near-perfect measurement if your RTA supports it.
While you can use your smartphone’s built-in microphone to tune your system and set your EQ, I don’t recommend it. Built-in mics have poor performance for measuring sound and your readings won’t be very good. This means you’ll never be able to get the sound quite right sadly.
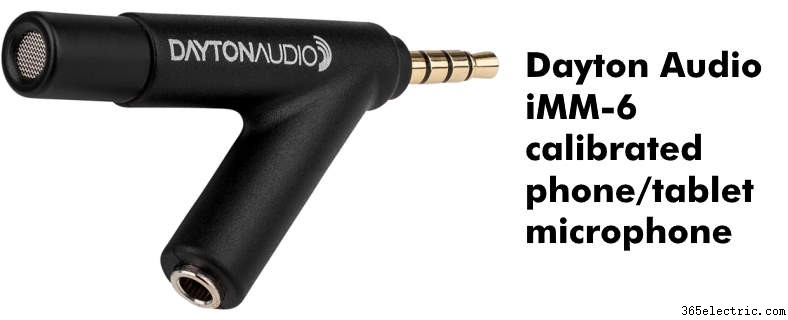
One option is to pick up an affordable calibrated microphone like the Dayton Audio iMM-6 at around $17. As an added bonus, each one includes a unique calibration file to help you get more accurate readings. To use that you’ll need an audio app that supports importing a calibration text file. (Not critical by any means but nice if you can)
More great audio articles to help
Would you love to learn more? Check out some of my other great articles!
- Find out how crossovers work and the science behind them.
- Pogrešna ocjena oma zvučnika? Here’s what happens if you use the wrong speaker impedance with a crossover.
- Saznajte što se događa s dB glasnoćom i snagom kada povećate impedanciju zvučnika.
- Set up your system the right way! Here’s how to set crossover frequencies for car audio.
- Check out my detailed guide to crossovers, slopes, and good crossover frequencies for car or home audio.
